3.2. ソースインストール (Linux、Unix)
From open-support.info
| This page is a DRAFT! The contants of this page are not complete and might contain errors. You may consult this page which contains more credible information: Book:OTRS 3.0 - Admin Manual/Chapter 3/2 |
Contents |
ソースインストールの準備作業
OTRS をソースからインストールする場合は、まず最初に .tar.gz、.tar.bz2 または .zip ファイル形式のソースアーカイブを http://www.otrs.org/downloads/ からダウンロードします。
アーカイブをディレクトリ /opt に解凍し、ディレクトリ名を otrs-3.0 から otrs に変更します。 tar 形式のアーカイブの例を以下に示します (スクリプト 3.4 参照)。
linux:/opt# tar xf /tmp/otrs-3.0.tar.gz linux:/opt# mv otrs-3.0 otrs linux:/opt# ls otrs linux:/opt# |
| スクリプト 3.4. OTRS インストールの最初のステップ |
OTRS を root 権限で動作させるべきではありません。 そこで次にすべきことは、OTRS 用に新規ユーザを作成することです。 この新規ユーザのホームディレクトリは /opt/otrs でなければなりません。 Web サーバが新規 'otrs' ユーザと同じユーザ権限で動作しているのでなければ (ほとんどのシステムでは動作していないでしょう)、新規 'otrs' ユーザを Web サーバユーザグループに追加します (スクリプト 3.5 参照)。
linux:/opt# useradd -r -d /opt/otrs/ -c 'OTRS user' otrs linux:/opt# usermod -G nogroup otrs linux:/opt# |
| スクリプト 3.5. 新規ユーザを作成しグループに追加する |
次に、サンプル設定ファイルをコピーします。 後の段階でシステムはこの複写した設定ファイルを使用します。 複写元ファイルの拡張子は .dist で、ディレクトリ /opt/otrs/Kernel と /opt/otrs/Kernel/Config にあります (スクリプト 3.6 参照)。
linux:/opt# cd otrs/Kernel/ linux:/opt/otrs/Kernel# cp Config.pm.dist Config.pm linux:/opt/otrs/Kernel# cd Config linux:/opt/otrs/Kernel/Config# cp GenericAgent.pm.dist GenericAgent.pm |
| スクリプト 3.6. サンプルファイルをコピーする |
OTRS インストール準備作業の最後のステップは、全てのファイルに正しいアクセス権を設定することです。 この作業は、'otrs' ユーザのホームディレクトリ配下の bin ディレクトリにある、スクリプト otrs.SetPermissions.pl を使用して行います。 このスクリプトは以下のパラメータを設定して実行します:
-
otrs.SetPermissions.pl { OTRS ユーザのホームディレクトリ } { --otrs-user= OTRS ユーザ } { --web-user= Web サーバユーザ } [ --otrs-group= OTRS ユーザのグループ ] [ --web-group= Web サーバユーザのグループ ]
もしシステムの Web サーバがユーザ 'otrs' と同じ権限で動作している場合は、正しいアクセス権を設定するコマンドは otrs.SetPermissions.pl /opt/otrs --otrs-user=otrs --web-user=otrs となります。 SUSE システムでは Web サーバは ’wwwrun' ユーザの権限で動作しています。 Debian 系のシステムでは 'www-data' です。 従って正しいアクセス権を設定するコマンドは、例えば otrs.SetPermissions.pl /opt/otrs --otrs-user=otrs --web-user=wwwrun --otrs-group=nogroup --web-group=www のようになります。
Perl モジュールのインストール
OTRS が動作するためには、表 3-1 に示す Perl モジュールを追加インストールする必要があります。 OTRS をソースからインストールする場合には、これらのモジュールを手作業でインストールする必要があります。 このインストールは、Linux ディストリビューションのパッケージマネージャ (yast や apt-get 等) を使用するか、または本セクションで説明する、Perl シェルと CPAN を使用するやり方で行います。 例えば Windows 用の ActiveState Perl を使用する場合は、組み込み Perl パッケージマネージャの PPM を使用します。 もし可能であれば、パッケージマネージャを使用することを推奨します。
| パッケージ名 | 説明 |
|---|---|
| DBI | データベースバックエンドへのコネクションを確立します。 |
| DBD::mysql | MySQL データベースバックエンド接続用の専用関数が含まれます (MySQL を使用する場合のみ必要)。 |
| DBD::pg | PostgreSQL データベースバックエンド接続用の専用関数が含まれます (PostgreSQL を使用する場合のみ必要)。 |
| Digest::MD5 | md5 アルゴリズムを使用可能にします。 |
| CSS::Minifier | CSS ファイルを軽量化し、別ファイルに直接出力します。 |
| Crypt::PasswdMD5 | 相互運用可能な MD5 ベース暗号化関数を提供します。 |
| MIME::Base64 | BASE64 文字列をエンコード・デコードします。 メール添付ファイル等で使用します。 |
| JavaScript:Minifier | JavaScript を軽量化し、別ファイルに直接出力します。 |
| Net::DNS | ドメインネームシステム用の Perl インターフェイスです。 |
| LWP::UserAgent | HTTP リクエストを処理します。 |
| Net::LDAP | LDAP ディレクトリ用の Perl インターフェイスです (LDAP バックエンドを使用する場合のみ必要)。 |
| GD | GD グラフィックライブラリ用のインターフェイスです (OTRS 統計モジュールを使用する場合のみ必要)。 |
| GD::Text, GD::Graph, GD::Graph::lines, GD::Text::Align | GD グラフィックライブラリ用の追加テキスト・グラフィックツール (OTRS 統計モジュールを使用する場合のみ必要)。 |
| PDF::API2, Compress::Zlib | レポート、検索結果およびチケット印刷画面を PDF 出力する場合に使用されます。 |
otrs.CheckModules.pl でインストールする必要のあるモジュールを確認できます。 このスクリプトは 'otrs' ユーザホームディレクトリ配下の bin ディレクトリにあります (スクリプト 3.7 を参照)。
いくつかのモジュールのインストールはオプションであることに注意してください。
linux:~# cd /opt/otrs/bin/
linux:/opt/otrs/bin# ./otrs.CheckModules.pl
   o CGI............................ok (v3.49)
   o Crypt::PasswdMD5...............ok (v1.3)
   o CSS::Minifier..................ok (v0.01)
   o Date::Format...................ok (v2.24)
   o Date::Pcalc....................ok (v1.2)
   o DBI............................ok (v1.609)
   o DBD::mysql.....................ok (v4.013)
   o Digest::MD5....................ok (v2.36_01)
   o Encode::HanExtra...............ok (v0.23)
   o GD.............................ok (v2.44)
      o GD::Text....................ok (v0.86)
      o GD::Graph...................ok (v1.44)
      o GD::Graph::lines............ok (v1.15)
      o GD::Text::Align.............ok (v1.18)
   o IO::Scalar.....................ok (v2.110)
   o IO::Wrap.......................ok (v2.110)
   o JavaScript::Minifier...........ok (v1.05)
   o JSON...........................ok (v2.21)
      o JSON::PP....................ok (v2.27003)
      o JSON::XS....................Not installed! (Optional - Install it for faster AJAX/JavaScript handling.)
   o LWP::UserAgent.................ok (v5.829)
   o Mail::Internet.................ok (v2.06)
   o Mail::POP3Client...............ok (v2.18 )
      o IO::Socket::SSL.............ok (v1.31)
   o MIME::Base64...................ok (v3.07_01)
   o MIME::Tools....................ok (v5.428)
   o Net::DNS.......................ok (v0.65)
   o Net::POP3......................ok (v2.29)
   o Net::IMAP::Simple..............ok (v1.1916)
      o Net::IMAP::Simple::SSL......ok (v1.3)
   o Net::SMTP......................ok (v2.31)
      o Authen::SASL................ok (v2.15)
      o Net::SMTP::SSL..............ok (v1.01)
   o Net::LDAP......................ok (v0.4001)
   o PDF::API2......................ok (v0.73)
      o Compress::Zlib..............ok (v2.008)
   o SOAP::Lite.....................ok (v0.712)
   o Text::CSV......................ok (v1.18)
      o Text::CSV_PP................ok (v1.26)
      o Text::CSV_XS................Not installed! (Optional - Optional, install it for faster CSV handling.)
   o XML::Parser....................ok (v2.36)
linux:/opt/otrs/bin#
|
| Script 3.7. Checking needed modules. |
不足しているモジュールは、できる限り Linux ディストリビューションのパッケージ管理システムからインストールすべきです。 この方法でインストールすると、バージョンアップやセキュリティーパッチが提供された際に、パッケージが自動的に更新されます。 追加パッケージをインストールする方法については、ディストリビューションのマニュアルを参照してください。 パッケージリポジトリに (正しいバージョンの) モジュールがない場合は、CPAN (Comprehensive Perl Archive Network) からインストールすることもできます。
上記のモジュールの一つを CPAN からインストールするには、コマンド perl -e shell -MCPAN を実行します。 Perl シェルが対話モードで起動した後、CPAN モジュールがロードされます。 既に CPAN が設定済みの場合は、コマンド install に続けてモジュール名を入力するとモジュールをインストールできます。 CPAN は他の Perl モジュールとの依存関係をチェックし、他のモジュールをインストールする必要がある場合は通知します。
さらに、ディレクトリ /opt/otrs に移動しコマンド perl -cw bin/cgi-bin/index.pl および perl -cw bin/otrs.PostMaster.pl を実行します。 これらのコマンドの出力が "syntax OK" であれば、Perl は正しく導入されています (スクリプト 3.8 参照)。
linux:~# cd /opt/otrs linux:/opt/otrs# perl -cw bin/cgi-bin/index.pl cgi-bin/installer.pl syntax OK linux:/opt/otrs# perl -cw bin/otrs.PostMaster.pl otrs.PostMaster.pl syntax OK linux:/opt/otrs# |
| スクリプト 3.8. 構文チェック |
Apache Web サーバの設定
本節では、Apache Web サーバと mod_cgi の OTRS 向け設定について説明します。 Web サーバは CGI スクリプトが実行可能になっていなければなりません。 OTRS は Perl スクリプトが構文解析できないと動作しません。 Web サーバの設定ファイルを調べて、CGI モジュールがロードしている行を探してください。 以下のような行があれば、CGI モジュールは既に使用可能になっています。
LoadModule cgi_module /usr/lib/apache2/modules/mod_cgi.so
OTRS の Web インターフェイスに短いアドレスで便利にアクセスできるように、Alias および ScriptAlias エントリを定義する必要があります。 大部分の Apache 導入システムには conf.d ディレクトリがあります。 Linux システムでこのディレクトリを探してください (おそらく /etc/apache または /etc/apache2 の配下にあります)。root 権限でログインして conf.d ディレクトリに移動し、code>/opt/otrs/scripts/apache2-httpd.include.conf</code> の中の適切なテンプレートを Apache 設定ディレクトリに otrs.conf として複写してください。
Web サーバを再起動して新しい設定をロードします。 大部分のシステムではコマンド /etc/init.d/apache2 restart で Web サーバを起動・再起動できます (スクリプト 3.11 参照)。
linux:/etc/apache2/conf.d# /etc/init.d/apache2 restart Forcing reload of web server: Apache2. linux:/etc/apache2/conf.d# |
| スクリプト 3.11. Web サーバを再起動する |
これで Web サーバは OTRS 用に設定されました。
もし mod_perl をインストール可能であれば、mod_cgi の替わりに Apache Web サーバを mod_perl を使用する設定にしてパフォーマンスを改善できます。 これは以下のように行います:
Please ensure that mod_perl is installed and loaded, in order to take advantage of this feature. Due to the nature of the start-up script, your server will not fail to start if mod_perl is not properly loaded or compiled in your apache web server, unless mod_cgi is also on. Technically speaking you can leave mod_cgi on as well, but you should not.
Search your /etc/apache* directory for mod_perl.so (see Script 3.12 below) to see if the module is already loaded.
#:/ grep -Rn mod_perl.so /etc/apache* |
| Script 3.12. Searching for mod_perl. |
When you use the appropriate start script listed above and the module is loaded, the script (when commented in) /opt/otrs/scripts/apache2-perl-startup.pl can be used to load the perl modules into memory one time, saving on load times and increasing performance.
Configuring the database
The simple way - Using the web installer (works only with MySQL)
If you use MySQL as the database back-end, you can use the OTRS web installer:
http://localhost/otrs/installer.pl
When the web installer starts, please follow the next steps to setup your system:
-
Check out the information about the OTRS offices and click on next to continue (see Figure 3.1 below).
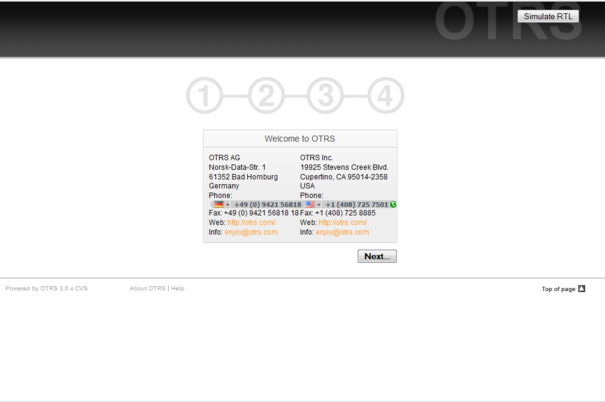 Figure 3.1. Welcome screen.
-
Read the GNU Affero General Public License (see Figure 3.2 below) and accept it, by clicking the corresponding button at the bottom of the page.
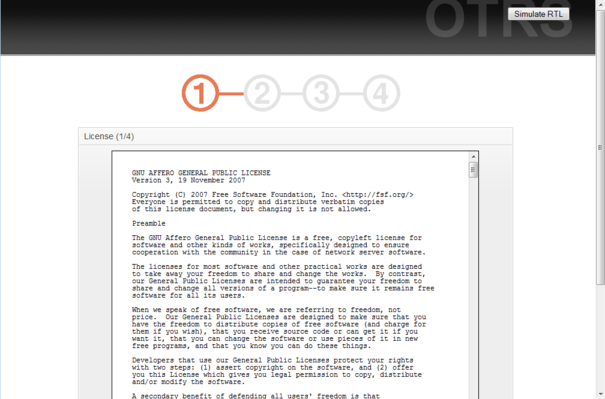 Figure 3.2. GNU Affero General Public License.
-
Provide the username and password of the administrator, the DNS name of the computer which hosts OTRS and the type of database system to be used. After that, check the settings (see Figure 3.3 below).
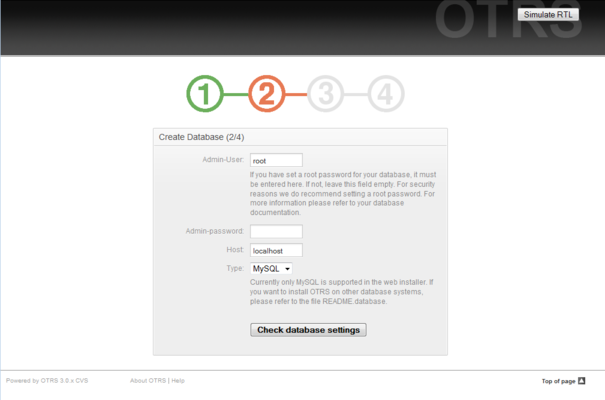 Figure 3.3. Database initial settings.
If the checking was successful, you will get a notification. Press OK to continue (see Figure 3.4 below).
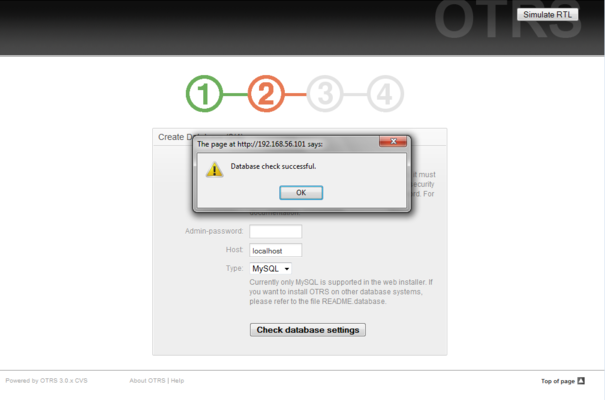 Figure 3.4. Successful checking notification.
-
Create a new database user, choose a name for the database and click on next (see Figure 3.5 below).

It is never a good idea to use default passwords. Please change the default password for the OTRS database!
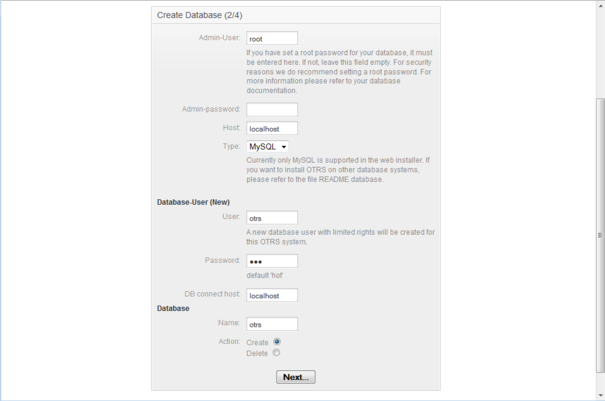 Figure 3.5. Database settings.
If the database and its user were successfully created, you will get a setup notification, as shown in the Figure 3.6. Click next to go to the next screen.
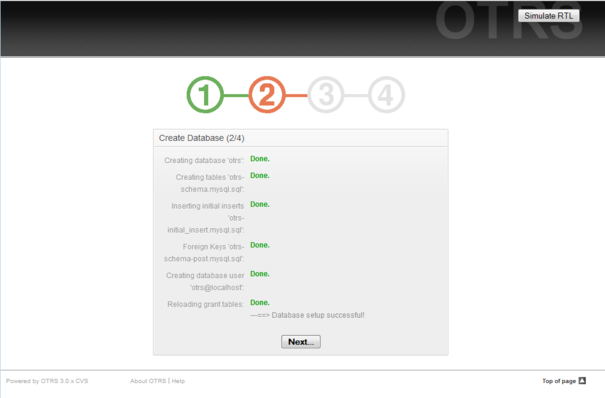 Figure 3.6. Successfully database setup notification.
-
Provide all the required system settings and click next (see Figure 3.7 below).
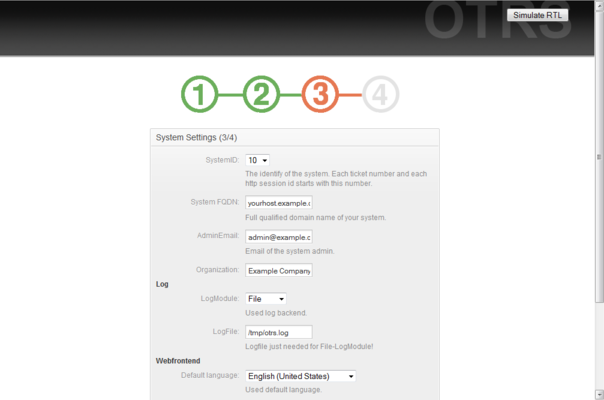 Figure 3.7. System settings.
-
If you want, you can provide the needed data to configure your inbound and outbound mail or skip this step by pressing the right button at the bottom of the screen (see Figure 3.8 below).
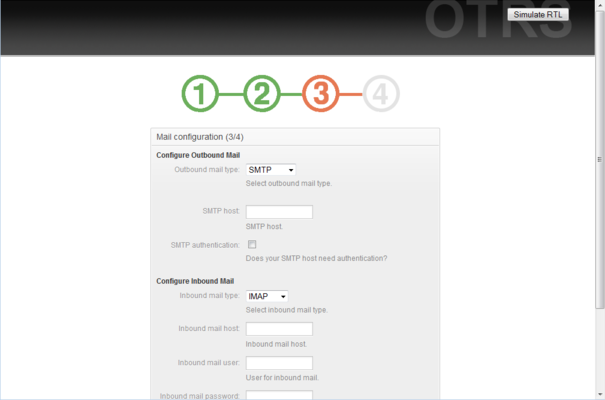 Figure 3.8. Mail configuration.
-
Restart the OTRS service now, to use the new configuration settings shown in the Script 3.13.
linux:~ # rcotrs restart-force
Shutting down OTRS
 Disable /opt/otrs/bin/otrs.PostMaster.pl ... done.
no crontab for otrs
 Shutting down cronjobs ... failed!
Shutting down OTRS (completely)
 Shutting down Apache ... done.
 Shutting down MySQL ... done.
                                                                     done
Starting OTRS (completely)
 Starting Apache ... done.
 Starting MySQL ... done.
Starting OTRS
 Checking Apache ... done.
 Checking MySQL ... done.
 Checking database connect... (It looks Ok!).
 Enable /opt/otrs/bin/otrs.PostMaster.pl ... done.
 Checking otrs spool dir...  done.
 Creating cronjobs (source /opt/otrs/var/cron/*) ... done.

  -->> http://linux.example.com/otrs/index.pl <<--
                                                                     done
                                                                     done
linux:~ #
Script 3.13. Restarting the OTRS service. -
Congratulations! Now the installation of OTRS is finished and you should be able to work with the system (see Figure 3.9 below). To log into the web interface of OTRS, use the address http://localhost/otrs/index.pl in your web browser. Log in as OTRS administrator, using the username root@localhost and the password root. After that you can configure the system for your needs.
Please change the password for the root@localhost account as soon as possible. 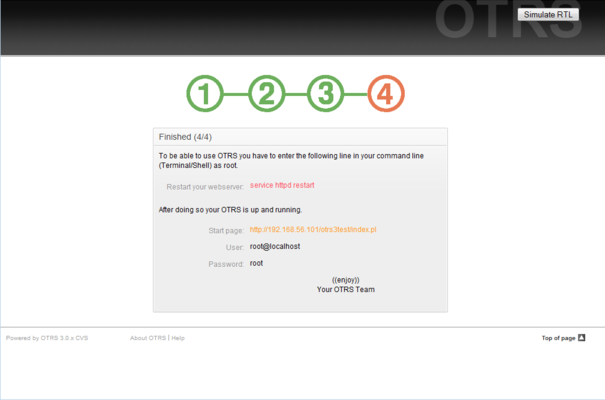 Figure 3.9. Final steps to install OTRS.


Installing the OTRS database manually
If you can't use the web installer to setup the OTRS database, you have to set it up manually. Scripts with the SQL statements to create and configure the database are located in scripts/database, in the home directory of the OTRS user (see Script 3.14 below).
linux:~# cd /opt/otrs/scripts/database/ linux:/opt/otrs/scripts/database# ls otrs-initial_insert.db2.sql otrs-schema.mysql.sql otrs-schema.oracle.sql otrs-initial_insert.mssql.sql otrs-schema-post.db2.sql otrs-initial_insert.mysql.sql otrs-schema.postgresql.sql otrs-initial_insert.oracle.sql otrs-initial_insert.postgresql.sql otrs-schema-post.mssql.sql otrs-initial_insert.xml otrs-schema-post.mysql.sql otrs-schema.db2.sql otrs-schema-post.oracle.sql otrs-schema-post.postgresql.sql otrs-schema.mssql.sql otrs-schema.xml linux:/opt/otrs/scripts/database# |
| Script 3.14. Files needed to create and configure the database. |
To setup the database for the different database back-ends the .sql files must be processed in a special order.
Create the OTRS database manually step by step
- Creating the DB: Create the database, that you want to use for OTRS, with your database client or your database interface.
- Creating the tables: With the otrs-schema.DatabaseType.sql files (e.g.. otrs-schema.oracle.sql, otrs-schema.postgresql.sql) you can create the tables in your OTRS database.
- Inserting the initial system data: OTRS needs some initial system data to work properly (e.g. the different ticket states, ticket and notification types). Depending on the type of your database Use one of the files otrs-initial_insert.mysql.sql, otrs-initial_insert.db2.sql, otrs-initial_insert.oracle.sql, otrs-initial_insert.postgresql.sql or otrs-initial_insert.mssql.sql .
- Creating references between tables: The last step is to create the references between the different tables in the OTRS database. Use the otrs-schema-post.DatabaseType.sql file to create these (e.g. otrs-schema-oracle.post.sql, otrs-schema-post.postgresql.sql).
After you have finished the database setup you should check and set proper access rights for the OTRS database. It should be enough to grant access to one user. Depending on the database server you are using, setting up the access rights differs, but it should be possible either with your database client or your graphical database front-end.
If your database and the access rights are configured properly, you have to tell OTRS which database back-end you want to use and how the ticket system can connect to the database. Open the file Kernel/Config.pm located in the home directory of the OTRS user and change the parameters shown in the Script 3.15 to your needs.
    # DatabaseHost
    # (The database host.)
    $Self->{'DatabaseHost'} = 'localhost';

    # Database
    # (The database name.)
    $Self->{Database} = 'otrs';

    # DatabaseUser
    # (The database user.)
    $Self->{DatabaseUser} = 'otrs';

    # DatabasePw
    # (The password of database user.)
    $Self->{DatabasePw} = 'some-pass';
|
| Script 3.15. Parameters to be customized. |
Setting up the cron jobs for OTRS
OTRS needs some cron jobs to work properly. The cron jobs should be run with the same user rights that were specified for the OTRS modules. That means that the cron jobs must be inserted into the crontab file of the OTRS user.
All scripts with the cron jobs are located in var/cron, in the home directory of the OTRS user (see Script 3.16 below).
linux:~# cd /opt/otrs/var/cron linux:/opt/otrs/var/cron# ls aaa_base.dist generic_agent.dist rebuild_ticket_index.dist cache.dist pending_jobs.dist session.dist fetchmail.dist postmaster.dist unlock.dist generic_agent-database.dist postmaster_mailbox.dist linux:/opt/otrs/var/cron# |
| Script 3.16. Files needed to create the cron jobs. |
All scripts are ending in .dist. You should copy them to files with no ending. If you are using bash, you might want to use the command listed in Script 3.17 below.
linux:/opt/otrs/var/cron# for foo in *.dist; do cp $foo `basename $foo .dist`; done linux:/opt/otrs/var/cron# ls aaa_base generic_agent-database.dist rebuild_ticket_index aaa_base.dist generic_agent.dist rebuild_ticket_index.dist cache pending_jobs session cache.dist pending_jobs.dist session.dist fetchmail postmaster unlock fetchmail.dist postmaster.dist unlock.dist generic_agent postmaster_mailbox generic_agent-database postmaster_mailbox.dist linux:/opt/otrs/var/cron# |
| Script 3.17. Copying and renaming all the files needed to create the cron jobs. |
Table 3-2 describes the different cron jobs and what they do.
| Script | Function |
|---|---|
| aaa_base | Sets the basics for the crontab of the OTRS user. |
| cache | Removes expired cache entries from disk. Clears the loader cache for CSS and JavaScript files. |
| fetchmail | Used only if new mails will be fetched with fetchmail into the ticket system. |
| generic_agent | Executes the jobs of the GenericAgent that are not stored in the database but in own config files. |
| generic_agent-database | Executes the jobs of the GenericAgent that are stored in the database. |
| pending_jobs | Checks in the system for pending tickets, and closes them or sends reminders if needed. |
| postmaster | Checks the message queue of the ticket system and delivers messages that are still in the queues. |
| postmaster_mailbox | Fetches the mails from the POP3 accounts that were specified in the admin area, in the section for "PostMaster Mail Accounts". |
| rebuild_ticket_index | Rebuilds the ticket index, which improves the speed of the QueueView. |
| session | Removes old and no longer needed session ID's. |
| unlock | Unlocks tickets in the system. |
To setup all cron jobs the script bin/Cron.sh can be used, which is located in the home directory of the OTRS user. When this script is executed, it needs a parameter to tell if you want to install, remove or reinstall the cron jobs. The following parameters can be used:
Cron.sh { start } { stop } { restart } [ OTRS user ]
Because the cron jobs need to be installed in the crontab file of the OTRS user, you need to be logged in as OTRS user. If you are logged in as root, you can change to the OTRS user with the command su otrs. Execute the commands specified in the Script 3.18 below to install the cron jobs.
|
|
Please note that other crontab entries of the OTRS user will be overwritten or removed by the Cron.sh script. Please change the Cron.sh script to keep also other crontab entries if needed. |
linux:/opt/otrs/var/cron# cd /opt/otrs/bin/ linux:/opt/otrs/bin# su otrs linux:~/bin$ ./Cron.sh start /opt/otrs/bin Cron.sh - start/stop OTRS cronjobs Copyright (C) 2001-2009 OTRS AG, http://otrs.org/ (using /opt/otrs) done linux:~/bin$ exit exit linux:/opt/otrs/bin# |
| Script 3.18. Installing the cron jobs. |
The command crontab -l -u otrs, which can be executed as root, shows you the crontab file of the OTRS user and you can check if all entries are right (see Script 3.19 below).
linux:/opt/otrs/bin# crontab -l -u otrs # -- # cron/aaa_base - base crontab package # Copyright (C) 2001-2011 OTRS AG, http://otrs.org/ # -- # This software comes with ABSOLUTELY NO WARRANTY. # -- # Who gets the cron emails? MAILTO="root@localhost" # -- # cron/cache - delete expired cache # Copyright (C) 2001-2011 OTRS AG, http://otrs.org/ # This software comes with ABSOLUTELY NO WARRANTY. # -- # delete expired cache weekly (Sunday mornings) 20 0 * * 0 $HOME/bin/otrs.CacheDelete.pl --expired >> /dev/null 30 0 * * 0 $HOME/bin/otrs.LoaderCache.pl -o delete >> /dev/null # -- # cron/fetchmail - fetchmail cron of the OTRS # Copyright (C) 2001-2011 OTRS AG, http://otrs.org/ # -- # This software comes with ABSOLUTELY NO WARRANTY. # -- # fetch every 5 minutes emails via fetchmail #*/5 * * * * /usr/bin/fetchmail -a >> /dev/null # -- # cron/generic_agent - otrs.GenericAgent.pl cron of the OTRS # Copyright (C) 2001-2011 OTRS AG, http://otrs.org/ # -- # -- # This software comes with ABSOLUTELY NO WARRANTY. # -- # start generic agent every 20 minutes */20 * * * * $HOME/bin/GenericAgent.pl >> /dev/null # example to execute GenericAgent.pl on 23:00 with # Kernel::Config::GenericAgentMove job file #0 23 * * * $HOME/bin/otrs.GenericAgent.pl -c "Kernel::Config::GenericAgentMove" >> /dev/null # -- # cron/generic_agent - GenericAgent.pl cron of the OTRS # Copyright (C) 2001-2011 OTRS AG, http://otrs.org/ # -- # This software comes with ABSOLUTELY NO WARRANTY. # -- # start generic agent every 10 minutes */10 * * * * $HOME/bin/otrs.GenericAgent.pl -c db >> /dev/null # -- # cron/pending_jobs - pending_jobs cron of the OTRS # Copyright (C) 2001-2011 OTRS AG, http://otrs.org/ # -- # This software comes with ABSOLUTELY NO WARRANTY. # -- # check every 120 min the pending jobs 45 */2 * * * $HOME/bin/otrs.PendingJobs.pl >> /dev/null # -- # cron/postmaster - postmaster cron of the OTRS # Copyright (C) 2001-2011 OTRS AG, http://otrs.org/ # -- # This software comes with ABSOLUTELY NO WARRANTY. # -- # check daily the spool directory of OTRS #10 0 * * * * test -e /etc/init.d/otrs & /etc/init.d/otrs cleanup >> /dev/null; test -e /etc/rc.d/init.d/otrs && /etc/rc.d/init.d/otrs cleanup >> /dev/null 10 0 * * * $HOME/bin/otrs.CleanUp.pl >> /dev/null # -- # cron/postmaster_mailbox - postmaster_mailbox cron of the OTRS # Copyright (C) 2001-2011 OTRS AG, http://otrs.org/ # -- # This software comes with ABSOLUTELY NO WARRANTY. # -- # fetch emails every 10 minutes */10 * * * * $HOME/bin/otrs.PostMasterMailbox.pl >> /dev/null # -- # cron/rebuild_ticket_index - rebuild ticket index for OTRS # Copyright (C) 2001-2011 OTRS AG, http://otrs.org/ # -- # This software comes with ABSOLUTELY NO WARRANTY. # -- # just every day 01 01 * * * $HOME/bin/otrs.RebuildTicketIndex.pl >> /dev/null # -- # cron/session - delete old session ids of the OTRS # Copyright (C) 2001-2011 OTRS AG, http://otrs.org/ # -- # This software comes with ABSOLUTELY NO WARRANTY. # -- # delete every 120 minutes old/idle session ids 55 */2 * * * $HOME/bin/otrs.DeleteSessionIDs.pl --expired >> /dev/null # -- # cron/unlock - unlock old locked ticket of the OTRS # Copyright (C) 2001-2011 OTRS AG, http://otrs.org/ # -- # This software comes with ABSOLUTELY NO WARRANTY. # -- # unlock every hour old locked tickets 35 * * * * $HOME/bin/otrs.UnlockTickets.pl --timeout >> /dev/null linux:/opt/otrs/bin# |
| Script 3.19. Crontab file. |